Onhold A Shot in the Dark
Play Onhold A Shot in the Dark
Onhold A Shot in the Dark Screenshots


Onhold A Shot in the Dark review
A player-first walkthrough, deep dive, and tips for Onhold A Shot in the Dark
Onhold A Shot in the Dark is a narrative-driven adult-oriented game with branching choices, multiple character routes, and scene-based progression; this guide walks you through the experience, strategy, and notable moments while keeping the focus squarely on the game itself. In this post you’ll find a clear walkthrough for major choices, tips to unlock alternate paths, technical considerations, and my personal experiences from multiple playthroughs to help you get the most from Onhold A Shot in the Dark. Whether you’re replaying to see different outcomes or starting fresh, this guide is written from a player perspective to make progression smoother and more enjoyable.
Gameplay and Mechanics of Onhold A Shot in the Dark
Let’s be honest—jumping into a dense, branching narrative game can be intimidating. 😅 You’re staring at the screen, a dialogue choice pops up, and you’re paralyzed. “Does this one word change the entire story?” In Onhold A Shot in the Dark, the answer is often a thrilling, nerve-wracking “yes.” 😮 This guide is your flashlight in the dark, designed to demystify the systems so you can focus on the story and characters you love.
Understanding the Onhold A Shot in the Dark mechanics is the first step to mastering its world. It’s not just about clicking; it’s about understanding the invisible gears turning beneath every scene.
Core systems and interface 🎮
At its heart, the gameplay systems in Onhold A Shot in the Dark will feel familiar to visual novel veterans, but it adds a few brilliant twists of its own. You navigate primarily through a classic point-and-click interface. Click on characters to talk, click on items in the environment to examine them, and click on exits to move to new areas. It’s intuitive and keeps you immersed in the beautifully crafted scenes.
Where the game truly shines is in its layered interaction menus. When in conversation, you’re not just picking from a list of lines. You’re often managing a dynamic choice menu that changes based on your previous decisions, your relationship levels, and even items in your inventory. A choice greyed out isn’t just a random lock; it’s a direct consequence of your journey so far.
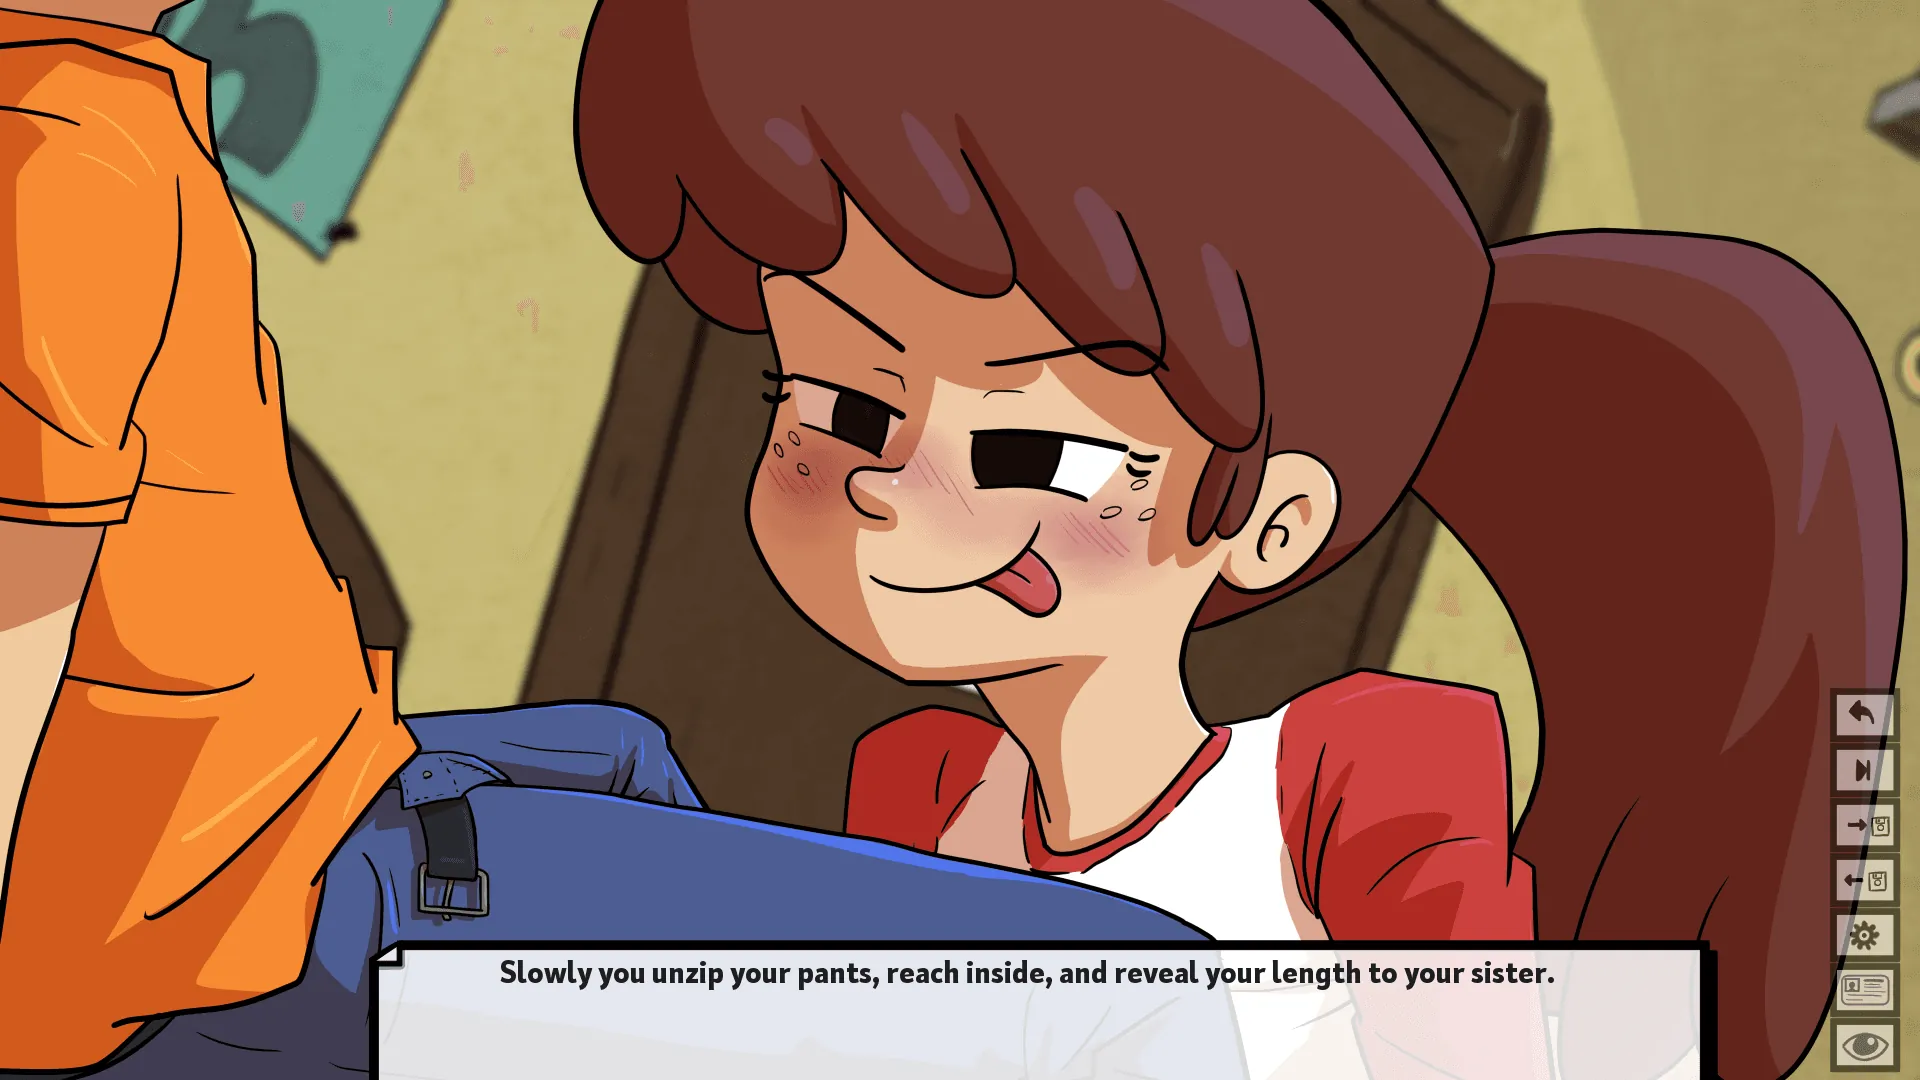
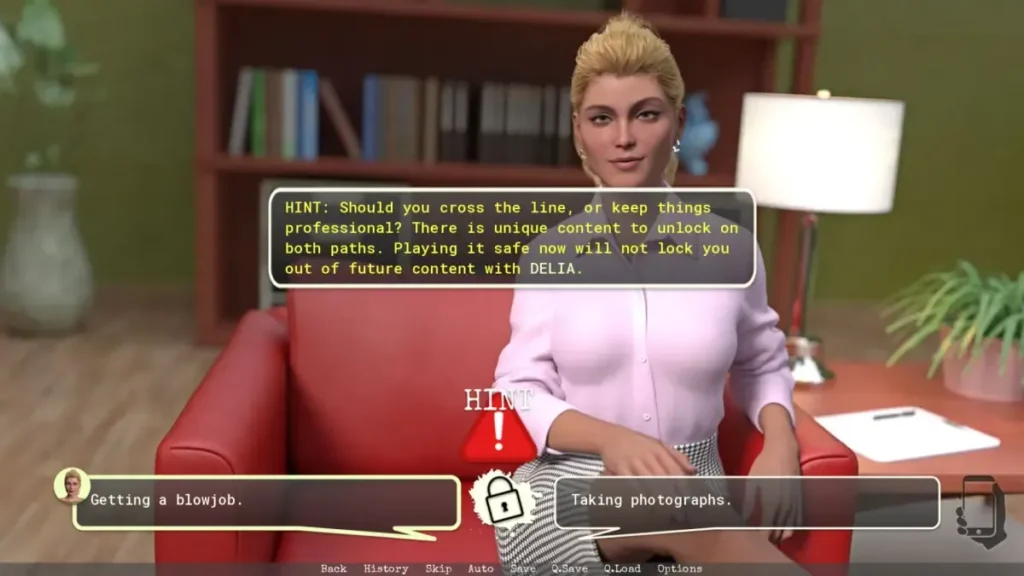
One of the most unique Onhold A Shot in the Dark mechanics is the camera mechanic. 🎥 This isn’t just for flavor. At specific, tense moments, you’ll be prompted to “take a photo.” This isn’t a simple click. You must frame the shot, choosing what—or who—to focus on within the scene. This single action can function as a major narrative flag. Focusing on Character A’s secretive glance instead of Character B’s dropped item can send your story spiraling down two completely different paths. It’s a genius way of making a passive action feel intensely active and consequential.
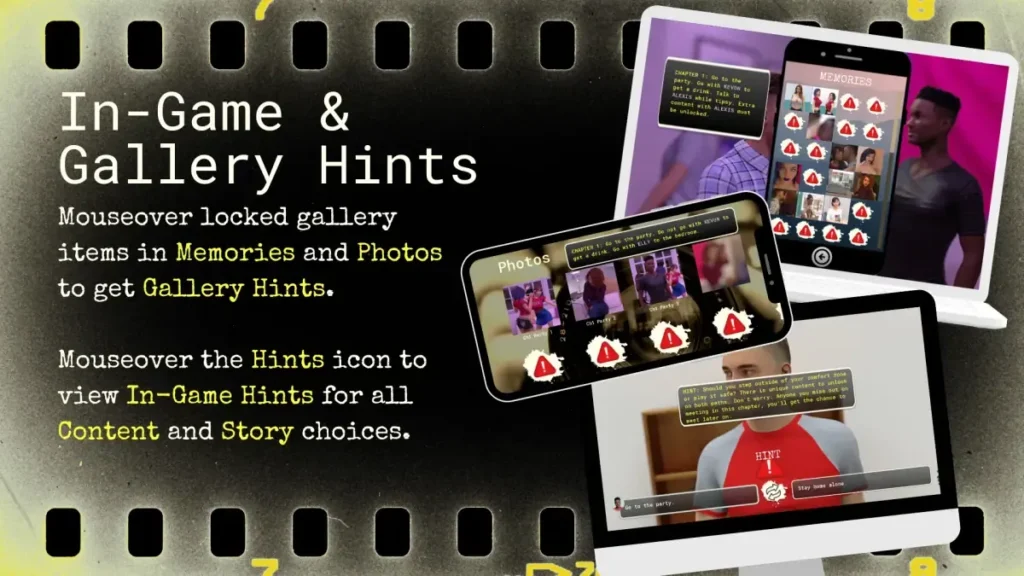
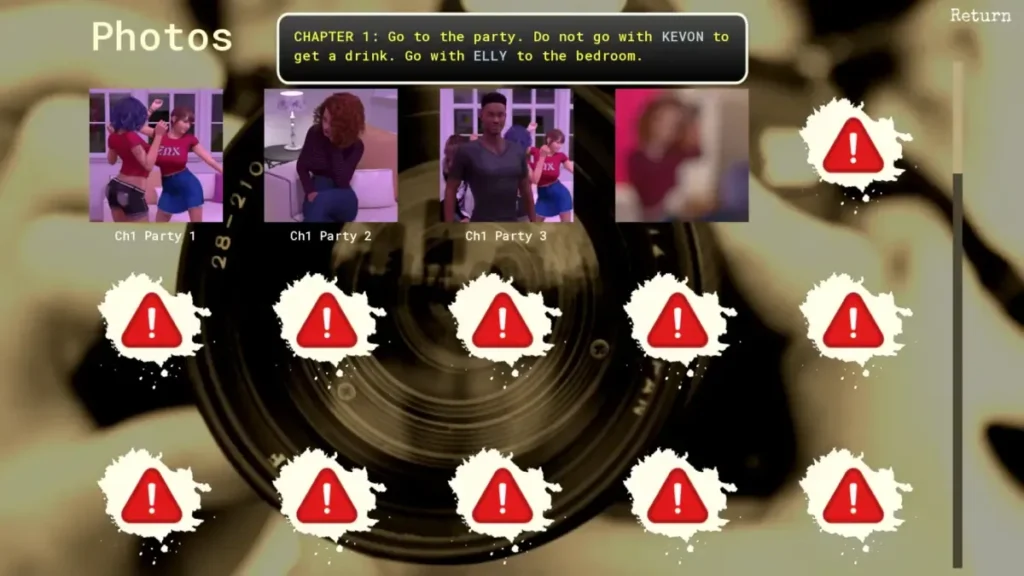
The game also tracks your progress through subtle scene and animation counters. While there’s no explicit “percentage complete” bar taunting you on a main menu, the game’s gallery quietly logs every unique scene and special animation you’ve triggered. This is your best friend for completionists, providing a clear, spoiler-free checklist of what you’ve seen and what mysteries remain.
Pro Tip: Don’t just spam-click through environments! The camera mechanic can sometimes be triggered outside of obvious story moments. If a scene feels particularly detailed or charged, try clicking around. You might snap a photo that unlocks a hidden piece of lore or a future dialogue option.
How choices affect routes and scenes 🧭
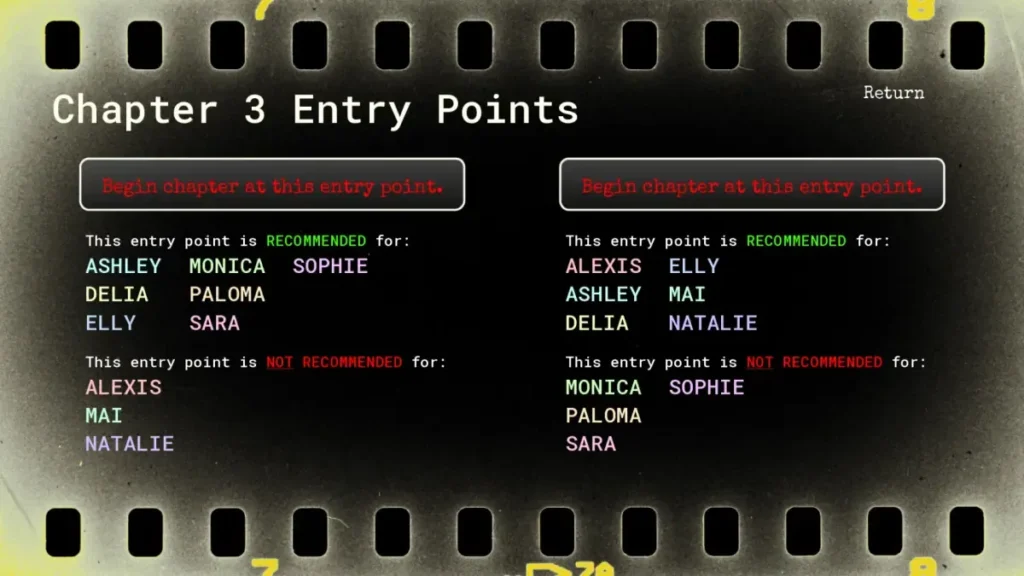
This is where the magic happens—and where many players get lost. The branching narrative guide for this game isn’t about a simple “good vs. bad” path. It’s a web of choice-driven routes influenced by relationship flags and story triggers that are often set far earlier than you’d think.
Think of every major character as having an invisible meter. This isn’t a number you see, but the game remembers. Did you agree with Kai’s cynical plan in Chapter 2? That raised a hidden flag for his route. Did you later choose to share a confidential document with them? That’s another flag. Meanwhile, choosing to trust Elara’s intuition in that same chapter might have quietly begun closing Kai’s path and opening hers.
The key is recognizing pivotal choice points. These are moments where the music shifts, the dialogue pauses, or the choice language is unusually direct (“Trust Kai” / “Investigate Alone”). These are your major branch points. However, the more insidious influences are the seemingly casual choices. Asking “How are you feeling?” versus “What do you know?” might seem like role-play flavor, but one could build empathy (a relationship flag) while the other builds suspicion (a different story trigger).
Here’s a common pitfall: early-game locks. I learned this the hard way. On my first playthrough, I was desperate to see a specific, rumored late-game scene with the enigmatic character, Rook. I played what I thought was a perfect route, always supporting him. Yet, the scene never triggered. Why? Because back in Chapter 1, I had chosen to answer a phone call from another character during a crucial quiet moment with Rook. That single, seemingly minor action—taking the call—told the game I was prioritizing another connection. It set a flag that quietly made the deep, intimate Rook scene impossible hours later. I had to replay the entire game from that point to fix it!
To help visualize, let’s map a simple example to reach a sample “Elara: Confidant” route:
| Chapter | Key Choice | Mechanics & Impact |
|---|---|---|
| Chapter 1: The Introduction | When Elara hesitates, choose “Give her time.” | Sets an initial relationship flag for “Patience with Elara.” Needed to unlock deeper conversations later. |
| Chapter 2: The Locked Door | Use the camera mechanic to photograph the locket she dropped, not the broken lock. | The photo item becomes a key for a dialogue option in Chapter 4. Focusing on the personal item boosts her relationship meter. |
| Chapter 3: The Argument | Side with Elara’s theory, even if evidence is thin. Choose “I believe you.” | This is a major pivotal choice point. This solidifies your route alignment and locks out a competing character’s path. |
| Chapter 4: The Storm | When prompted, show her the photo of the locket from Chapter 2. | Uses an inventory item from a past choice. Triggers a unique, route-specific scene that only plays if both the item exists and your relationship flag is high enough. |
See how it builds? The Onhold A Shot in the Dark mechanics are a chain of cause and effect. One choice opens a door, the next walks you through it.
Save strategy and replay approach 💾
If you take only one piece of advice from this entire guide, let it be this: Your save file is your most powerful tool. A smart save strategy is the difference between a frustrating, repetitive slog and an efficient, rewarding journey through all the content. Here’s my battle-tested method, born from that painful Rook-scene miss.
Step-by-Step Save Strategy:
- The Foundation Save: At the VERY start of the game, before any choices, create Save Slot 1. Label it “00 START.” This is your golden ticket back to the beginning without restarting the whole game.
- Chapter Saves: At the beginning of each new chapter or major location, use a new save slot. Label them clearly: “01 City Start,” “02 Mansion Arrival,” etc.
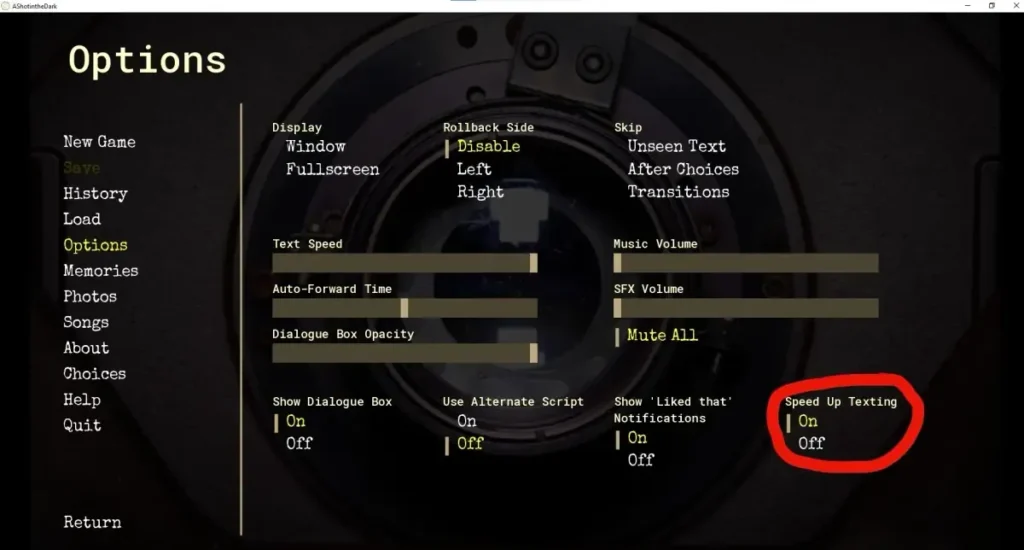
- The Decision Save: This is crucial. The moment you see a choice menu that feels significant (use the “pivotal choice” clues above!), HIT QUICK-SAVE. The game’s quick-save/quick-load feature is instant. Do this every single time.
- The Branch Save: Once you make a big choice and see the scene play out, if you want to explore the other branch later, create a new manual save. Label it descriptively: “03 Sided With Kai” or “04 Photo of Door.”
- The Milestone Save: After completing a route and seeing an ending, save in a new slot labeled with the ending/character, e.g., “Elara_Confidant_END.” This preserves your completed route for the gallery.
My personal naming convention looks like this in my save menu:
00_START
01_Chapter1_Start
01a_PrePhoneChoice
02_Chapter2_KaiPath
02_Chapter2_ElaraPath <-- My branch save from Chapter 1
03_WithElara_StormScene
Why go through all this trouble? Because the replay value is immense, but your time is precious. This system lets you jump back to any major fork without replaying hours of identical content. Want to see what happens if you took that phone call in Chapter 1? Load “01a_PrePhoneChoice,” make the other choice, and rocket down a new choice-driven route.
For your replay order, I recommend this approach to maximize new content:
1. Blind Playthrough: Play naturally with your gut. Use your save strategy, but don’t reload. See where you end up! This is your most authentic story.
2. Opposite Route Replay: Load your earliest branch save and choose the opposite major decisions. This often yields the most dramatically different story.
3. Completionist Run: Using a guide (or your own notes), target the specific flags you missed to unlock the rarest scenes and gallery entries.
Keep a Play Log! 📓 Open a notes app on your phone or keep a pad nearby. Jot down puzzling choices and their immediate results. “Ch2: Gave documents to Kai -> He was nicer in Ch3.” This turns your playthrough into a detective case and is the best branching narrative guide you can write for yourself.
Replay tips for Onhold A Shot in the Dark ultimately boil down to this: be curious, be systematic, and let the game’s brilliant gameplay systems work for you. Don’t fear missing out. With a solid save strategy, every “mistake” is just an opportunity to witness another facet of this deep, reactive world. Happy exploring, and may all your photos capture the truth you’re seeking. 🔍✨
This guide covered Onhold A Shot in the Dark from core mechanics and save strategies to a detailed walkthrough of key choices, technical considerations, and player-focused tips. Use the save-management techniques, walkthrough choices, and troubleshooting steps as you replay to unlock more routes and scenes. If you found this guide helpful, try a recommended playthrough path, share your experiences with the community while respecting spoiler etiquette, and bookmark the walkthrough for reference during future replays.